Archive
Excel 2010, Connection files on the Network, SharePoint Data Connection Libraries, and the Enterprise
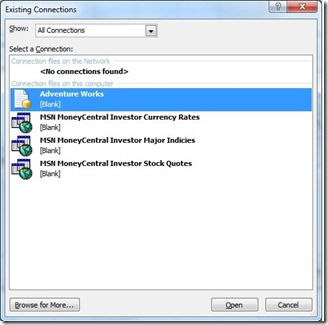
As shown below, in the Workbook Connections dialog of Excel 2010, when a user attempts to add a new connection a list of existing Office Data Connection (.odc) files to add is presented. One of the categories in this list is Connection files on the Network. I searched, and searched and searched on the internet for a way to enable SharePoint Data Connection Libraries (DCL) to be listed in this section and the only “workable” solution that I came to was David Lean’s blog post of nearly two years ago. To get a DCL visible on the client, David had to hack the registry of the client computer even after specifying the URL of the DCL in the Publish Links to Office Client Applications functionality in a User Profile Service Application (UPSA). Even David in this post says this seems insane and he hadn’t thoroughly researched. Over a year and a half later, still nothing new was been published, at least that I could find. Wanting to know why, I thought if I stopped the UPSA I bet this is still going to work and what do you know, I disabled the UPSA and I was still able to access my DCL directly through Excel. Being the forever academician, I had to know what was happening and why this worked the way it did. This blog post is the fruits and spoils of this investigation.
His solution, though “workable”, is actually a hybrid of two different ways the ultimate objective could be achieved. One approach is to use Group Policy exclusively to push registry entries out directly to the client as David explains in his blog post. This approach is the purest way to implement and is applicable if you’ll only have a very small number of predefined DCL and Document Libraries that you’ll want to publish. This method requires your domain admin set up the entries that define each published link. The other way is to use the Publish links to Office Client Applications functionality of a UPSA. An UPSA is an absolute pain in the $#*$ to install. How bad? Well when SQL Server 2012 RC3 was released last summer, there was a tweet of Chris Webb’s where he stated, “Installing SQL Server 2012 and SharePoint 2010 is a lot like brain surgery; one mistake and you’re screwed.” Having now installed SQL Server 2012 several times as well as installing the UPSA several times, the SharePoint Reporting Services Service Application installation process is an absolute breeze compared to the UPSA installation process; more on that later.
Why?
Before describing the process, I thought I’d briefly diverge and discuss why publication of a DCL is important in an enterprise reporting architecture built on the Microsoft Business Intelligence suite. And since my career pretty much revolves around SSAS, the reasons described here will be almost exclusively SSAS centric. There are several reasons besides the one already mentioned in the David Lean’s blog post. First, connections to SSAS databases can be created and managed in a central location without users having any knowledge of the connection details. It’ll just work without non-technical personnel having to know how, why, or where. Second, when using Excel Services in a reporting architecture against SSAS, the connection details must be stored in a trusted site in your SharePoint farm. Religiously using connections stored in DCLs published in the Connection files on the Network will minimize Excel Services issues. And lastly, when using the UPSA Publish Links to Office Client Applications feature, creation of new connections and the publication of those new connections to the appropriate audiences is greatly facilitated.
So now knowing why, how? I’ll describe the steps that I used to accomplish beginning with the UPSA approach from soup to nuts. The end result is that registry entries are created on the client machine. Those registry entries, the same ones mentioned in David Lean’s blog post, are what enables Office client applications to see published DCLs and Document Libraries. The only difference between the two approaches is how those blog entries are created.
The User Profile Service Application Approach
Creating the User Profile Service Application
I’m not going to present an exhaustive step-by-step guideline to installing the UPSA. Spenser Harbar has already published the definitive guide for that. I’m only including this section to describe some of the issues I ran into when creating a UPSA with SP1. I can’t stress enough that to get a UPSA working you should follow the guide step-by-step and not skip a single step. I’m just including this section to document some of the issues I faced.
- First issue – When attempting to Manage the UPSA for the first time, I was greeted with a nasty, non-descript error. Nothing was logged to the Event log. Turns out that a Windows update was applied that broke the UPSA with application of Sharepoint SP1. To resolve the issue, the patch related to KB2560890 had to be reinstalled. More can be read on that issue here.
- Second issue – When attempting to create an Active Directory connection, I received an “Unable to process Create message” error. Turns out this was also another SP1 issue. To resolve the issue, I had to install the August 2011 Cumulate Update. Turns out the cumulative update would have also rectified the first issue, but I didn’t know that at the time.
Once the August 2011 Cumulative Update was applied, I finally had a working UPSA connected to my AD. To add a published link, I followed the approach described on Technet. Since I was testing with the SharePoint Business Intelligence Center site template, I added a link to the http://testsite:15000/Data Connections for PerformancePoint location. That should complete all the SharePoint server configuration that was needed. [I was using a different port for my My Sites site collection, hadn’t created a host header, nor added DNS entries because frankly, I was just testing this functionality out. In a real environment, you would want to do it the right way.]
There is one other task that I performed that I cannot confirm that was needed. One person states that to push published links to client applications to function correctly, the Desktop Experience Feature has to be installed on the SharePoint server. I’m not sure if that’s the case but in my situation, I had this Feature installed.
Setting the Default My Site Location
Now, if you’re like me, you thought you were done. If I just launch Excel 2010 from my client machine, I should now see my published links in the Save and Send menu. However, it didn’t quite work that way. What I discovered, mainly from reading how this functionality worked with SharePoint 2007 and Office 2007, was that I needed to open a browser and navigate to my SharePoint site, http://testsite. I then needed to select the My Site menu option. When I clicked on the link corresponding to my logon id, what I was expecting to see based upon the SharePoint 2010 documentation, was an option to specify this My Site as my default My Site. However, that functionality seemed to disappear with Office 2010. Unfortunately, that wasn’t the intention with Office 2010 because in order for the Publish links to Office client applications to function, a critical registry entry is needed and the Set as Default My Site option is the exact option that performs that step. Back to the internet and the resolution of the Third issue.
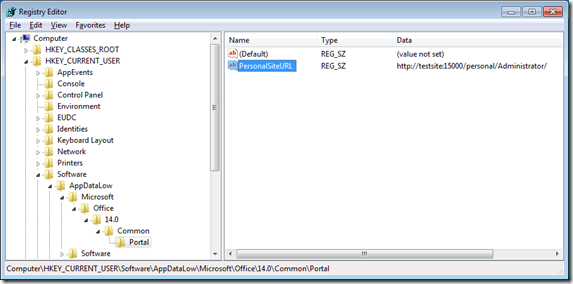
- Third issue – You’ll need to hack the registry for the Set as Default My Site functionality to show up with Office 2010. Paul LieBrand has described the correction for this in his blog post. http://paulliebrand.com/2011/09/27/set-as-default-my-site-sharepoint-sites-or-my-sharepoint-sites-missing-in-office-2010-on-sharepoint-2007/ I was trying to avoid a solution where I’d have to hack the registry on each client machine but we’ll get to a fix for that later. There’s a far better solution to accomplish what the Set as Default My Site functionality does anyway using Group Policy. Once the registry corrections are applied, when you navigate to your My Site location and click on the My Content menu option, a modal dialog box will now be displayed asking you if you wish to set this location as your default My Site location. Once this location is set, the dialog box is not shown again.What does this step actually do? All that has been done thus far is a registry entry, PersonalSiteURL has been set under the HKCU\Software\AppDataLow\Microsoft\Office\14.0\Common\Portal registry key as shown below:
- So unless you can get everyone that needs to use the DCL to create their My Site location, click on the My Content menu option, and set their default My Site location, you’re going to be fielding complaints.
Publish Links
So now, when I launch Excel and I choose the option to add an External Data Connection, I’m expecting to see my published DCLs shown in the Connection files on the Network section of my Existing Connections dialog. The first time I click on the Add button of the Workbook Connections dialog box, I see nothing. Why isn’t it working? Actually, it did just work but it needed me to click on the Add button for it to be kick started. When I clicked on the Add button a couple of registry entries were created. First, a LinkPublishingTimeStamp registry entry was created in the HKCU\Software\AppDataLow\Microsoft\Office\14.0\Common\Portal registry key, the same key where my PersonnalSiteURL registry entry was created. This registry entry records the time the SharePoint UPSA application was last checked for published links. Rather than query the UPSA every time for published links that should be displayed in Existing Connections and other dialogs, as this list should be relatively static and reduce the amount of network traffic created by this feature, Office will not query the UPSA service again until 24 hours past this recorded timestamp value.
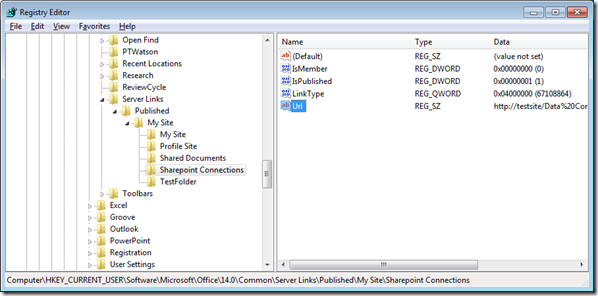
Along with the LinkPublishingTimeStamp registry entry, a whole slew of registry keys are created with one registry key for each link defined in the Publish Links to Office Client Applications feature in Central Administration. These links will be stored underneath the HKCU\Software\Microsoft\Office\14.0\Common\Server Links\Published\My Site registry key as shown below,
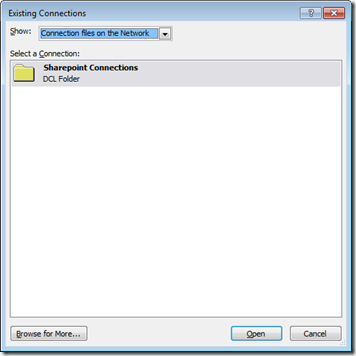
These registry keys are ultimately the original goal that we set out to achieve. When I attempt to add a new connection to my Excel workbook, I see a new option, Sharepoint Connections, i.e. the name of the registry key in the picture above in the Connection files on the Network section of my Existing Connections dialog as shown below.
A folder will be shown for each key listed under the HKCU\Software\Microsoft\Office\14.0\Common\Server Links\Published\My Site registry key with a LinkType Q-WORD registry entry with a hexadecimal value of 4000000. This LinkType value identifies the published link as a Data Connection Library. The IsMember and IsPublished registry entry keys are not optional as some blog posts have implied. These registry entries must also be present with a value of 0 and 1 respectively as shown in the figure above.
Once these registry entries exist for a user and on a given computer, the shared DCL corresponding to the registry key will be listed whenever the Existing Connections dialog box is displayed. So these seems like a lot of work, with a lot of dependencies, with a lot of things that could go wrong, just to display a shared DCL. Seems like there may be a better way in simple deployments where only a single DCL is needed. That better way is to create the corresponding registry entries through Group Policy. Now to discuss that approach.
Group Policy
Set Default My Site
Before discussing how a shared DCL might be pushed out to clients using a GPO, I thought I would discuss the use of GPO that would be applicable even if the UPSA approach is used. Rather than require all users to create there own My Site and set that location as the default My Site on any computer that they might use, populating the HKCU\Software\AppDataLow\Microsoft\Office\14.0\Common\Portal registry key using GPO is a far superior approach. Plus, one of the advantages of using an GPO in this case is that the incorrect registry entry problems discussed above don’t have to be addressed on each and every client machine.
Since I don’t claim to be much of an expert in domain administration, creating a GPO was unfamiliar territory for me. But then again, Sharepoint configuration is not exactly my forte either. Luckily for me, creating a GPO is really pretty easy. The only drawback is that you’ll have to have domain admin rights in order to create to a GOP. But since I’m using a virtual domain running on my laptop, no problem.
To create a GPO you’ll need to launch the Group Policy Management from the Administrative tools folder or you can type GPMC.MSC from the command line prompt. Expand your forest and domain nodes until the Group Policy Object folder is displayed and then perform the following operations:
- Right click on the Group Policy Object folder and select the New option from the popup menu. Enter Personal Site as the name for the GPO and leave the Source Starter GPO set to (none).
- Right click on the newly created Personal Site GPO and select Edit from the popup menu.
- Expand the User Configuration, Preferences, and Windows Settings nodes in the tree on the left hand side to expose the Registry entry.
- Right-click on the Registry node and select the New|Registry Entry from the popup menu.
- Change the Action property to Create.
- Leave the Hive value set on HKEY_CURRENT_USER and enter Software\AppDataLow\Microsoft\Office\14.0\Common\Portal as the Key Path.
- For the Value name, enter PersonalSiteURL.
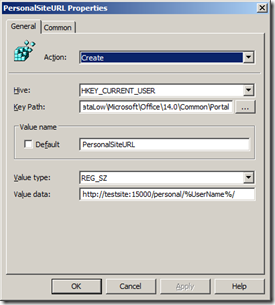
- Leave the Value type as the default of REG_SZ and enter http://testsite:15000/personal/%UserName%/ as the value data parameter. The dialog form should look like the screen shown below.
- Since we’re referencing the %UserName% variable to retrieve the current user id, select the Common tab and make sure the Run in logged-on user’s security context (user policy option) is selected.
- Close out of the Group Policy editor.
Now all that’s left to do is to link the GPO you just created to an organizational unit in your AD and this registry entry is generated without a user having to create a personal site.
Publishing a DCL through a GPO
If it’s this easy to push a registry entry out to an AD organizational unit using a GPO, and ultimately, the solution we’re striving for involves just creating these registry entries, why not just publish your DCL and document libraries through GPO? If you’ve got a small number of predefined links and your domain administrator is comfortable with defining the GPO and managing the targeted audiences, GPO will be a better implementation choice. Much less can go wrong with the GPO approach and it’s a much better user experience as all the user has to do to see the published links is to log in.
I would recommend creating a separate GPO for each shared link. Creating separate GPOs for each link will ease maintenance and allow for each published link to be targeted to the appropriate audience. DCL links and document library links are created identically and differ only in the value of the LinkType registry entry. Therefore, I’ll only present the steps necessary to publish a DCL using a GPO.
- Right click on the Group Policy Object folder and select the New option from the popup menu. Enter an identifier for the shared link, such as Enterprise Connections and leave the Source Starter GPO set to (none).
- Right click on the newly created GPO and select Edit from the popup menu.
- Expand the User Configuration, Preferences, and Windows Settings nodes in the tree on the left hand side to expose the Registry entry.
- Right-click on the Registry node and select the New|Registry Entry from the popup menu.
- Change the Action property to Create.
- Leave the Hive value set on HKEY_CURRENT_USER and enter Software\Microsoft\Office\14.0\Common\Server Links\Published\My Site\Sharepoint Connections as the Key Path.
- For the Value name, enter URL.
- Leave the Value type as the default of REG_SZ and enter the URL of your SharePoint DCL, i.e http://testsite/Data Connections for PerformancePoint.
- Create three additional registry entries with the Name, Data Type, and Values given in the table below.
|
Name |
Data Type |
Value |
| IsMember | REG_DWORD | 0 |
| IsPublished | REG_DWORD | 1 |
| LinkType | REG_QWORD | DCL: 00 00 00 04 00 00 00 00 Document Library: 00 20 00 00 00 00 00 00 |
Once you’ve linked this GPO to an organizational unit, the correct targeted audience will now be using the same data connection files to define all their Excel Services analyses.
Conclusions
This blog post started with the simple goal of presenting a DCL in the Connection files on the Network section of the Existing Connections dialog in Excel on a client machine. While the solution wasn’t necessarily complex, the available documentation is confusing, ambiguous, incomplete, and often erroneous; therefore, this blog post was written. What was found was that links that are listed in this section will appear in the HKCU\Software\Microsoft\Office\14.0\Common\Server Links\Published\MySite registry key. Whether these registry entries appear as a result of the Publish links to Office client applications or whether these registry entries are populated through GPO is a choice that each organization will need to decide. Below is my opinion on the pros and cons of each choice.
- Group Policy Object
- Pros
- No additional configuration steps required of user. If users will access on different machines, the entries will be created when Group Policy is applied.
- Easier implementation. No need to install and configure the User Profile Service Application and enable My Sites. (My sites not required if default My site reistry key set by GPO though)
- Published links will appear even the first time a user attempts to add an external resource.
- Cons
- Entries must be created by someone with domain admin rights.
- Creation of a published link more complex than defining through the user interface of a User Profile Service Application
- Pros
- User Profile Service Application
- Pros
- Published links created by Sharepoint farm admin rather than domain admin.
- Definition of published link created through Central Administration
- Cons
- If My Default Site link must be populated for the push mechanism to work. (Probably best to populate this entry through GPO even if the UPSA approach is used.)
- Entries will not appear be available the first time an external resource is added to a workbook.
- Pros
So that summarizes my experience with this feature and I’m not going to guarantee that everything stated is completely correct. If the default My Site registry entry is populated through a GPO, much of the problems with the UPSA approach are circumvented. Plus, that approach allows an enterprise to use the UPSA without requiring enabling of My Sites. If given my choice, that would be the approach that I would take.
